It seems there are some issues with the newest VESC Tool (as of 06/20/2019) including the absence of an ERPM limit for direction change (reverse) and unusable values applied with the motor setup wizard.
After a recent discussion with Trampa, it appears that feature requests are equal to “You are all very good at complaining instead of actually be thankful“. With that being the case I figured I’d write a tutorial, or “How-To”, for the Ackmaniac ESC-Tool so you guys have options for a safe & reliable reverse and a wizard that give accurate values.
I have been running this firmware for almost 2 years and have used this method dozens, likely hundreds, of times. If we can assume you have no pre-existing hardware issues and the install has been done correctly this WILL work, you will be riding in minutes.
If you see a mistake, please let me know and I will evaluate the requested change and commit it if needed.
Start with downloading the Ackmaniac ESC-Tool.
Ackmaniac ESC-Tool Link
Download file name: ACKMANIAC_ESC_TOOL_3_103.zip
After downloading the file, do this…
Right Click > Extract All > Extract
Double click the extracted folder named ACKMANIAC_ESC_TOOL_3_103
Double click the executable named ACKMANIAC-ESC-Tool.exe

If User Account Control (UAC, a protection schema in Windows 7, 8 & 10) prompts you to allow this program to run, click Run.
This is what you should see, this is the opening window of the ACKMANIAC ESC-Tool
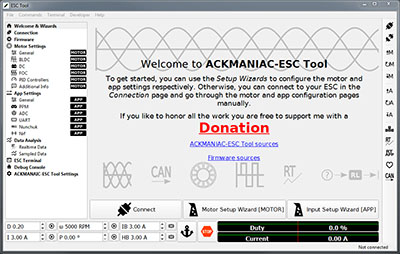
From here there are 3 major tasks you can do.
- Firmware update
This is the firmware you load on the VESC\ESC that enables you to use the Ackmaniac app to configure the VESC\ESC as well as use the Ackmaniac android app (discussed later on). - Motor Setup
This is where you configure the options for your specific motor or motors, including battery specifics, BLDC & FOC modes, etc. - App/Input setup
This is where you setup input values such as PPM type and values, Bluetooth, throttle curve, current vs. current with reverse, etc.
Firmware Update
Let’s begin with the Firmware Update by clicking the Firmware link on the right/top of the ESC-Tool window.

If you have a FocBox, Maytech 4.12 or FlipSky 4.12/4.20 ESC (VESC) you will want to use the Hardware Version 410 & 411 & 412. I will include instructions on updating VESC 6 variants if there is sufficient interest, but for now, this is for 4.12 & 4.20 VESC variants.
Now, power on your VESC and connect the USB cable to the VESC and then to the PC. Click the Connect button then click the Update Firmware button, now wait.


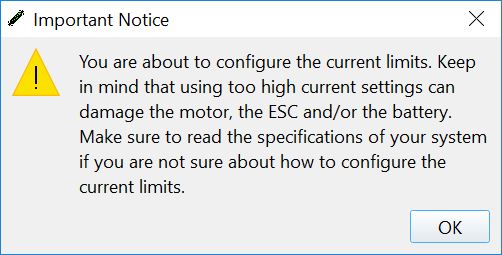
After you click update you will see this warning:
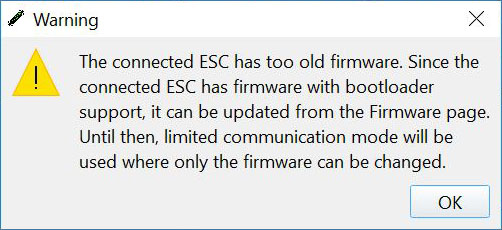
Click OK and let the app do its thing.
After a minute or so, the VESC will reboot with the new firmware loaded. After you see lights and the lights are steady, click the Connect button again. At the bottom right you will see a message with a green background defining the connection status and firmware level. As of this date (06/20/2019), the latest firmware version is 3.103, that is what it should report.

At this point we are going to use the wizards to set the major data values, then go back and specifically update a couple of things. I am not going to waste your time explaining all the intricacies of each value. I will explain the ones that are important, you can google the rest if you’re interested.
Motor Setup Wizard
Next, click the Welcome & Wizards button on the top/Left of the window.

We will start with the Motor Setup Wizard. Click the Motor Setup Wizard button.

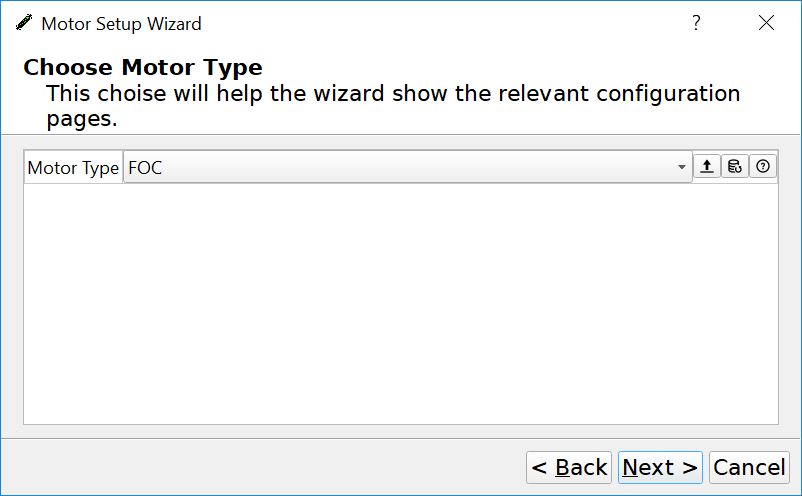
You will see the 1st screen of the Motor Setup Wizard, as shown below.

Click Next to advance. You will then see a warning asking if you want to load the default configuration. Say yes to this as we will specify all of the user defined values and allow the wizard to detect the rest.

The next option is to choose your motor type. In this tutorial, we are using FOC/Hybrid mode. Feel free to use BLDC mode, it’s a much simpler setup and typically should be performed before FOC if this is your first time using the ESC Tool. Click OK to advance.
Next, you will see a warning about current limits. You need to know the amperage (or current) limits of your battery. A 10s3p battery pack made with Samsung 30Q cells has a 60a maximum. A 10s4p has an 80a maximum. This value is divided by 2 if you are using 2 VESC’s. In this instance, we are using a 10s4p 30Q pack, so our limits are 40a per VESC. If you don’t know the limits for your pack stop here and go find out. Battery amps and motor amps are not the same thing. Click OK to advance.
Here is where we set those limits. The VESC I am using for this tutorial is a FlipSky Dual FSESC4.20 Plus which has a 50a max per side. The battery limits are 80a total, 40a per side.
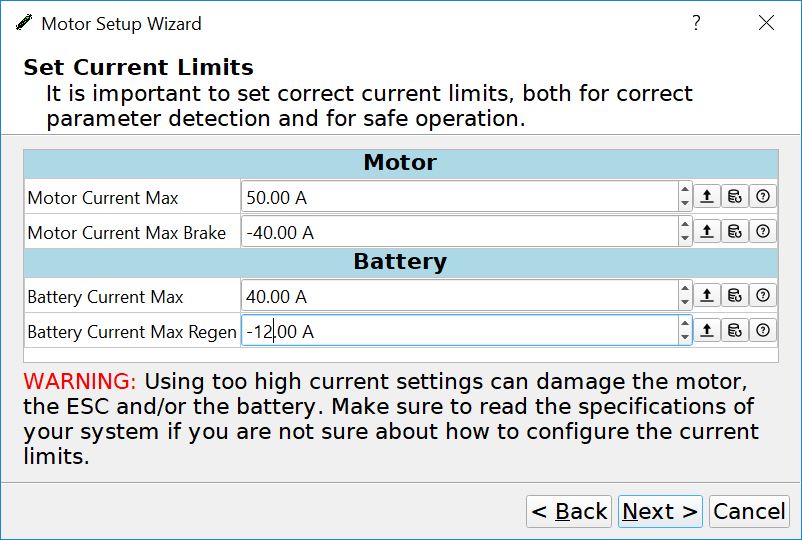
Here we have set the Motor Max to 50a as that is the ESC’s limit and motor amps should always be of a higher value than battery amps. We have defined the Motor Max Break at -40a and the Battery Max at 40a as this is our battery limit. We have defined the Battery Current Max Regen at -12a, with thane and this VESC I have found that to be perfect. Click Next to advance.
Here is where we set the Voltage Cutoff Start and End. All this does is tell you when your battery is almost dead. At the Cutoff start point, you will have much less power than normal. Take your rear-end to the house, cause you almost out of juice. When you reach the Cutoff end point, the VESC will no longer drive your motors. Be careful about pushing with a dead battery, badness can happen.
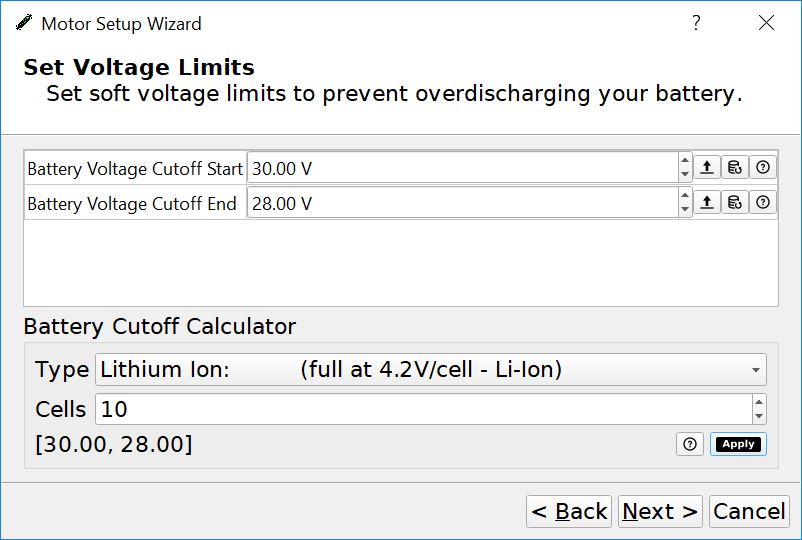
You can choose the value for series cells that you have in your pack and then click Apply, it does the math for you. Click Next to advance.
In this next section will need to decide if you want to run FOC or BLDC, if FOC Sensored or Unsensored. In this tutorial we are using Sensored FOC.
Next you will see FOC Settings section of the setup. This is where the VESC will spin up the motors to detect values. I like to do this without warning my daughter’s cat, as the process influences him to remove his hairy ass from the vicinity of my beer :).
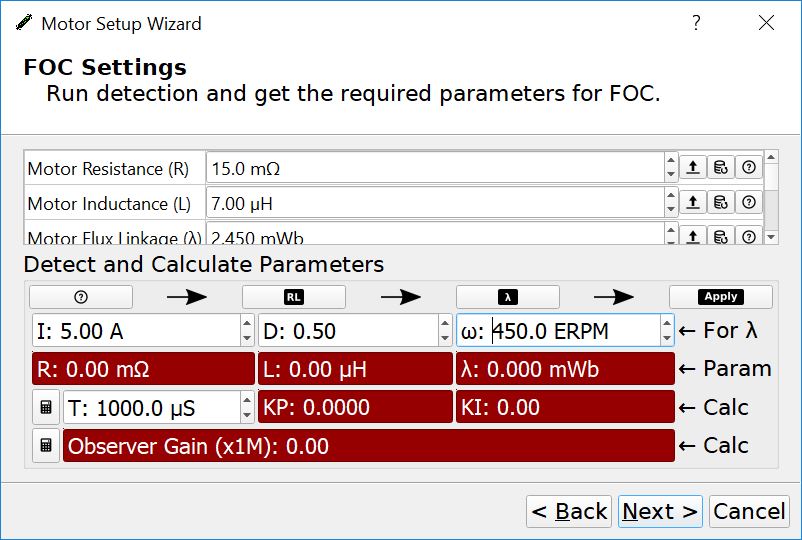
Click the RL button, your wheel will spin up. After the wheel has stopped click the A button (yeah, I know it’s not actually an A, we will cover that later…maybe). After the wheel has stopped click Apply and the Next.
You should see something like this.
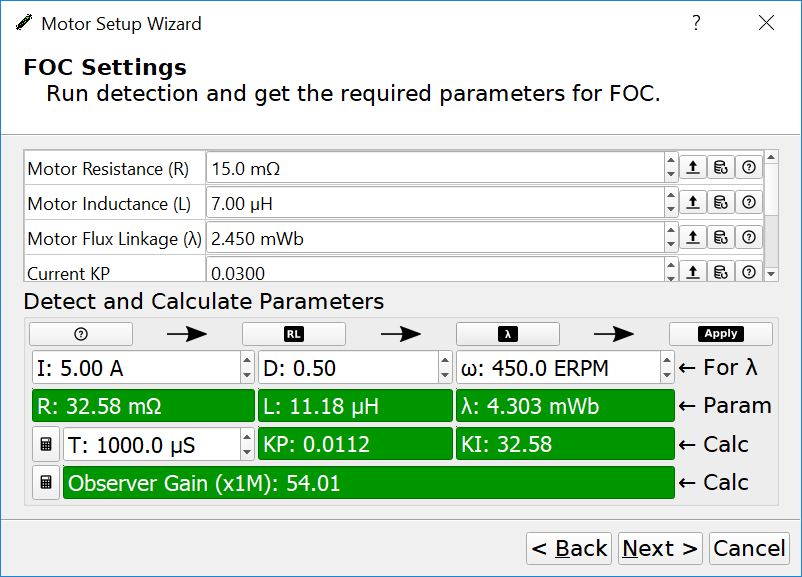
The former detections have defined the necessary values. Click Next to advance.
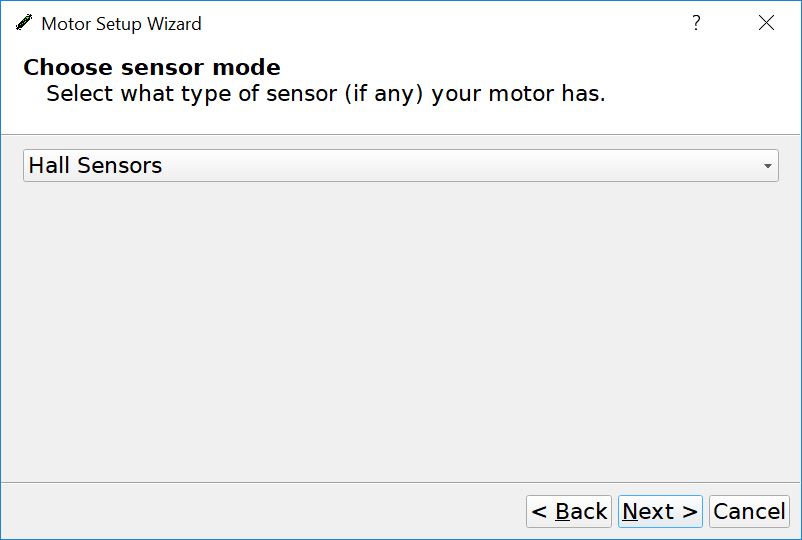
Next, you will detect the FOC values specific to your Hall Sensors.
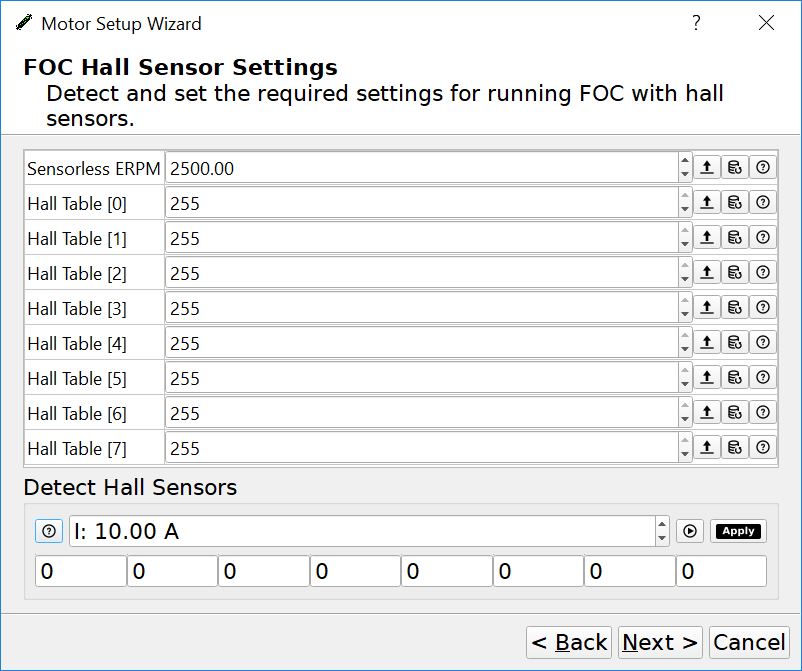
Click the tiny little Play button, next to the Apply button. You will see a warning telling you that your wheel will turn slowly, click OK. Your wheel will do a strange sort of jog, that’s normal (it’s also good for a further lesson to the cat). When the process is complete you will see something like this.
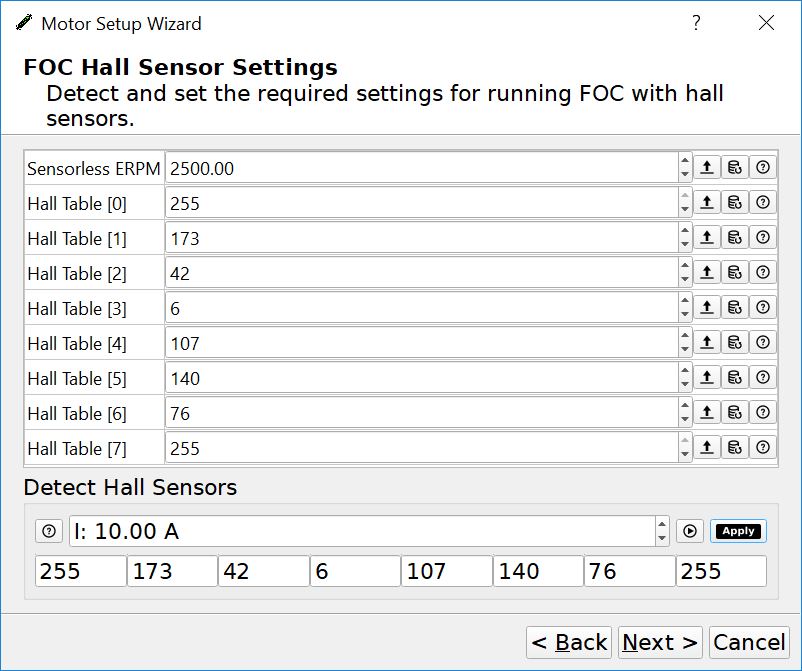
Some motors will have problems. I have seen otherwise perfect motors fail FOC detection over and over, specifically Direct Drive and Hub Motors. I have had success by raising and lowering the I value by 2 to 4 amps, do this at your own risk.
Click Next to advance. Now you are done!
Actually, you aren’t, that was just the Motor Detection, and only 1 of them in case your running dual motors.
So don’t be a crybaby and go back to the beginning of the Motor Detection setting and do it all again on your 2nd VESC. Oh, and you still have to do the App/Input setup, so yeah.
Input Setup Wizard
This is actually pretty fast and not at all difficult. Unless you’re on your 4th beer (like me), then you might be in for a challenge. Keep going, it’s fiiiiiiine :).
Make sure the USB cable is plugged into the master VESC and click the Input Setup Wizard button on the bottom/right of the Welcome & Wizards section.

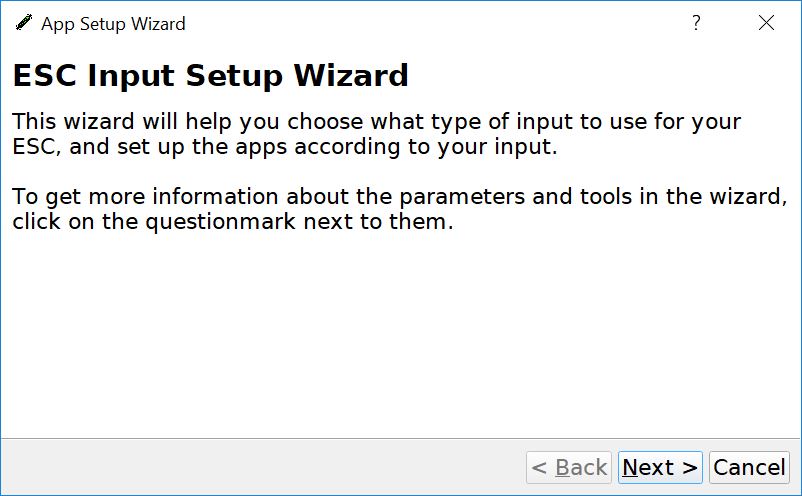
You will see the ESC Input Setup Wizard screen. Click Next to advance.
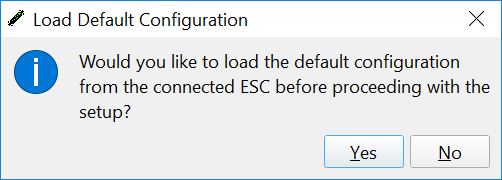
You will now see a warning about loading the default configuration, do this as it makes life a lot easier. Click Yes to advance.
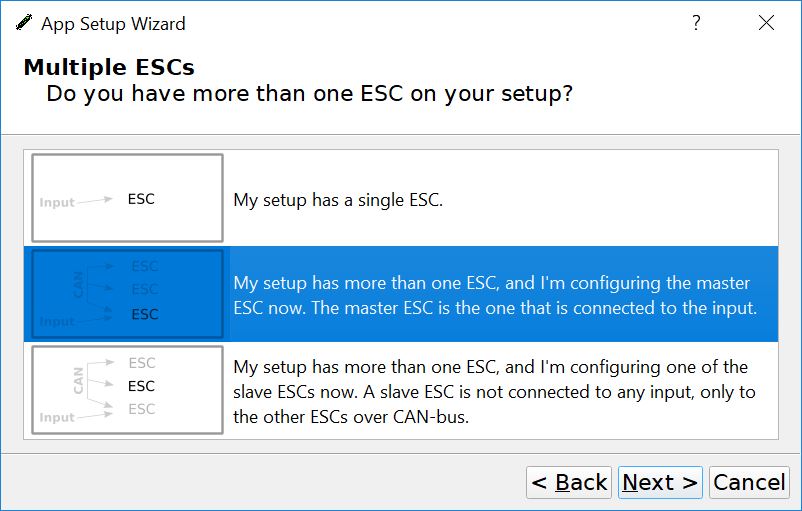
This is where you define if you’re using 1 or 2 VESC’s. This can get a little confusing as you can be physically using 2 VESC’s but would define this value as a single VESC if you’re using Split-PPM. In this tutorial, we are using 2 VESC’s with Can-Bus.
If you don’t know what Split-PPM and Can-Bus is just stop, go read, go read some more, come back, then go read some more. Seriously, without knowing this you can burn up a couple of VESC’s quick.
Since we are configuring your Master VESC click the middle option that says “My setup has more than one ESC and I am configuring the Master ESC now”.
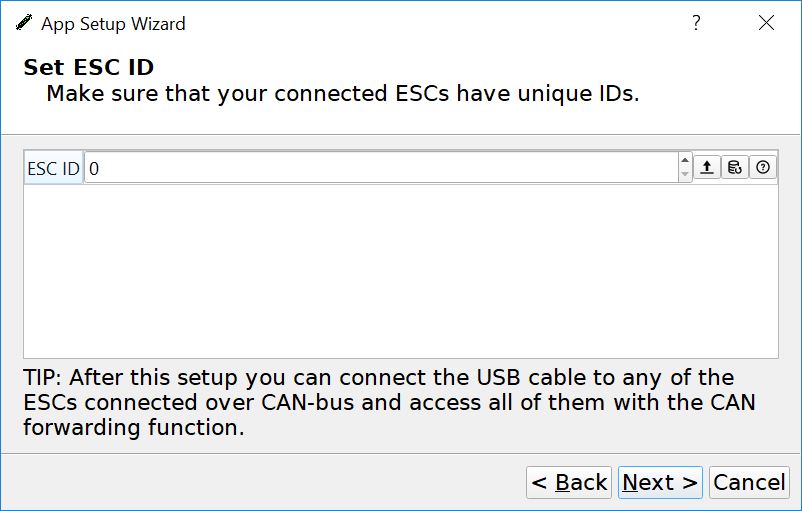
Here you define the ESC CAN ID. For the Master VESC use 0, for the Slave you will use 1. Click Next to advance.
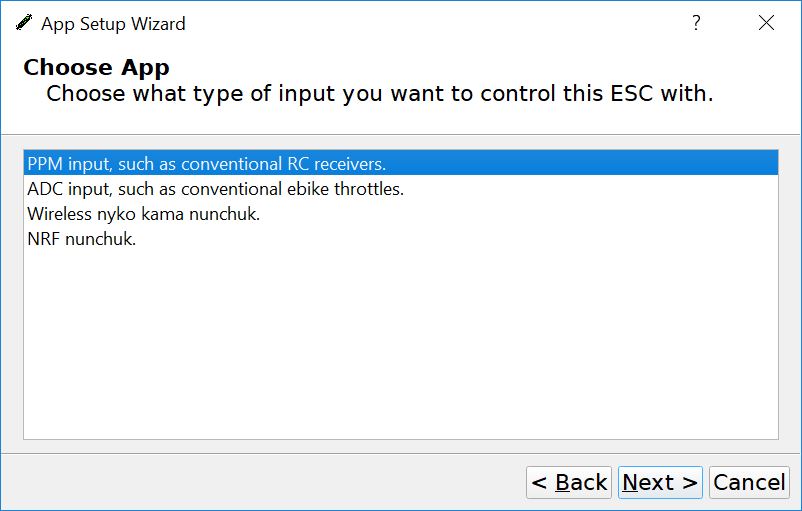
Next, you will define your application/input type. In most cases, you will use PPM Input. If you are using a TorqueBoards Nano, FlipSky Nano, Nano-X, Mini Remote, Hoyt Puck, Maytech V2 or any of a 100 other PPM devices this is what you select. Click Next to advance.
Next, you will see the PPM Mapping screen. This is really important so pay attention.
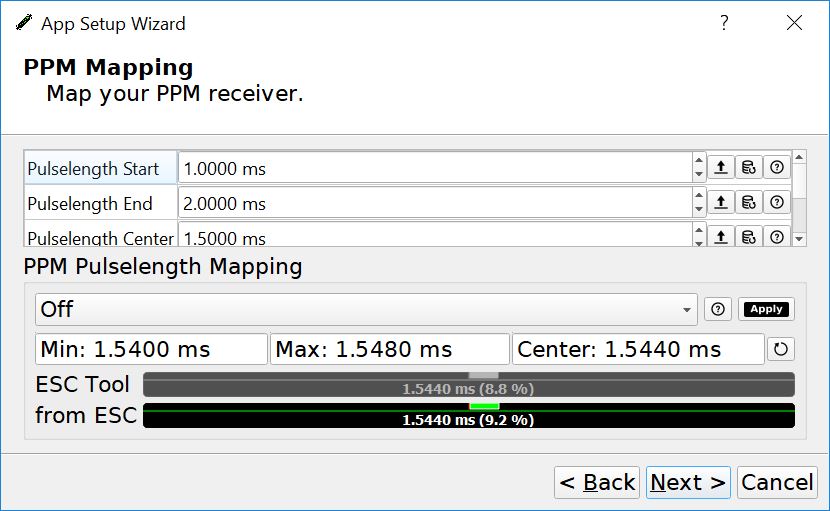
You need to define the maximum and minimum throw for the trigger/wheel on your remote. To do this run the trigger to max throttle, then to neutral, then to max brake. Do this 3 or 4 times. You will notice the Min, Max & Center values change, this is what you want.
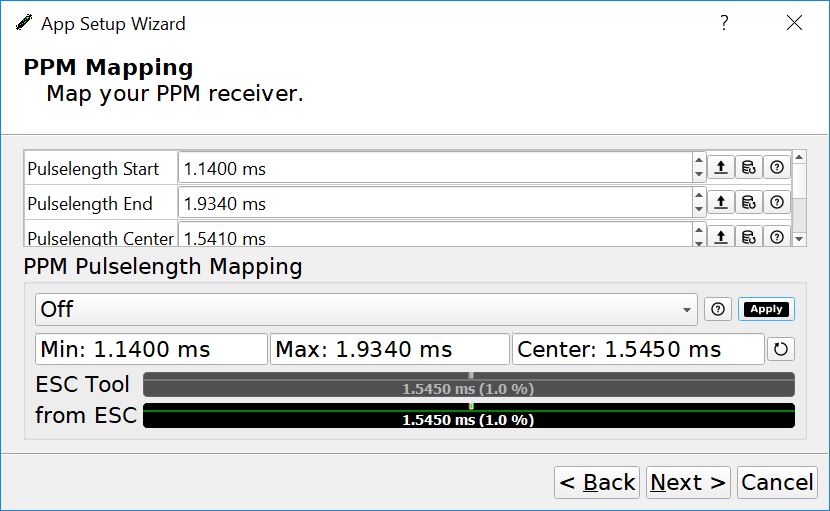
Once you see those values click Apply and then Next to advance.
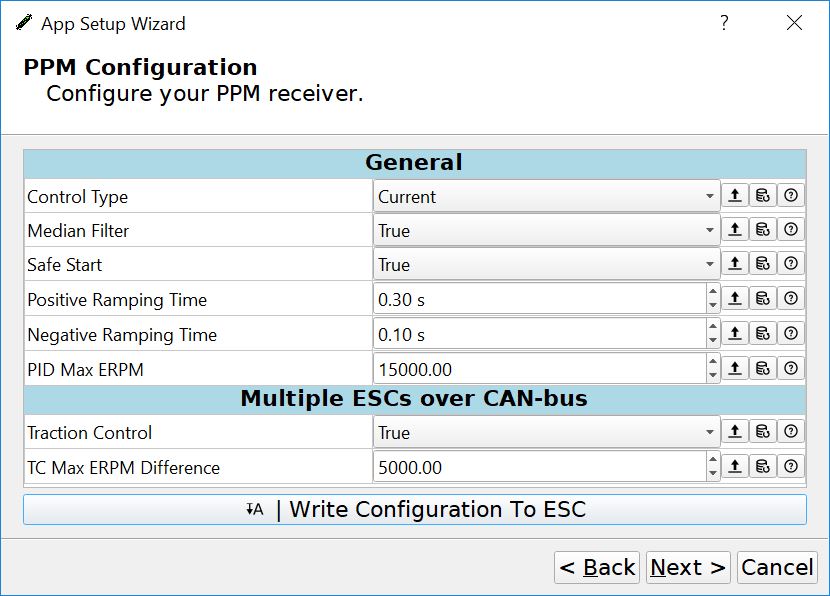
Now we are at the ever confusing, so much hated, not fun at all…Control Type. It’s really not that bad, let me lay it out for you.
99% of the boards in the world use Current No Reverse with Brake or Current. With Current No Reverse with Brake you have throttle forward control and brake control. With Current you have throttle forward control and throttle reverse control. In Current mode reverse is actually the brake. This can be a PIA when your trying to stop at a light or to talk to someone and all of sudden you’re going backwards because you didn’t let go of the trigger at exactly the right time. I will introduce you to Max Direction Switch ERPM Enabled, but we will get to that in a bit.
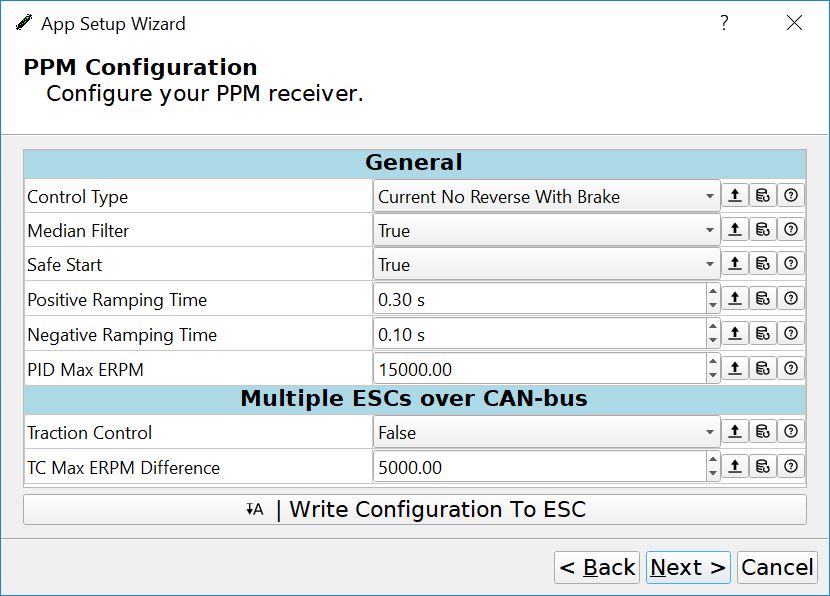
For now, if you want reverse select Current. If you don’t want reverse select Current No Reverse with Brake. If this is your first esk8, just pick Current No Reverse with Brake until you get some experience, trust me its a lot simpler to get used to.
Either way, set Traction Control to True. You’ll thank me later. This is what mine looks like. I kinda like reverse, mostly it’s just that @sender makes fun of me if I don’t have it enabled :(. Click Write Configuration To ESC and then click Next to advance.
You’re done with the Input Setup Wizard.

But are you? Actually, you’re not. You have to do it again on the Slave VESC, but it’s really easy.
Move the USB cable to the Slave VESC & click Connect then click the Input Setup Wizard button.
Do you remember how you picked “My setup has more than one ESC and I am configuring the Master ESC now“? This time pick “My setup has more than one ESC and I am configuring the Slave ESC now” then click Next.
Make sure the ESC CAN ID is set to 1, click Write Configuration To ESC and then click Next to advance.
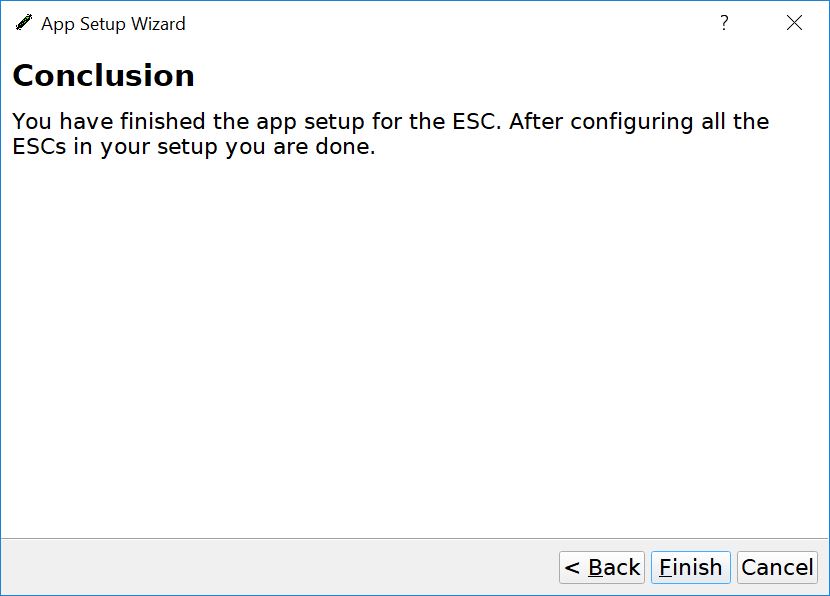
Now you really are done. Button that S.O.B up and go ride. Let me know how it goes. Unless it goes bad, keep that to yourself :).
EXTRAS: Bluetooth (HM-10 Module)
So you want bluetooth. You just want everything don’t you, you damned millennials. Naw, I’m just messing with you, it’s easy.
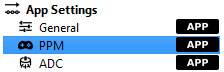
Assuming you have your HM-10 Module installed there are only a couple of steps. Insert your USB cable in the Master VESC, click Connect the click the Read App Config button (it’s the up arrow with an A beside it on the right-hand side of the window).
Go to App Settings > General.

There is a field labeled App to use, change that from PPM to PPM and UART.

Go to App Settings > UART. Set the Baudrate to 9600 bps. Click the Write App Config button (it’s the down arrow with an A beside it on the right-hand side of the window).
All done.
EXTRAS: Throttle Curves
Throttle curves are so awesome. It makes acceleration at low speeds more reliable and at higher speeds less finicky. Feel free to experiment, it can’t hurt, just be careful on the first few rides until you get used to it.
The throttle curve I’m going to show you is what I use most of the time. It works great on batteries that output 40a to 80a, on both urethane and pneumatic wheels.
Insert your USB cable in the Master VESC, click Connect the click the Read App Config button Click App Settings > PPM > Throttle Curve

This is the default view, you will see there is no curve. This means the throttle is linear from full positive to neutral to full negative.
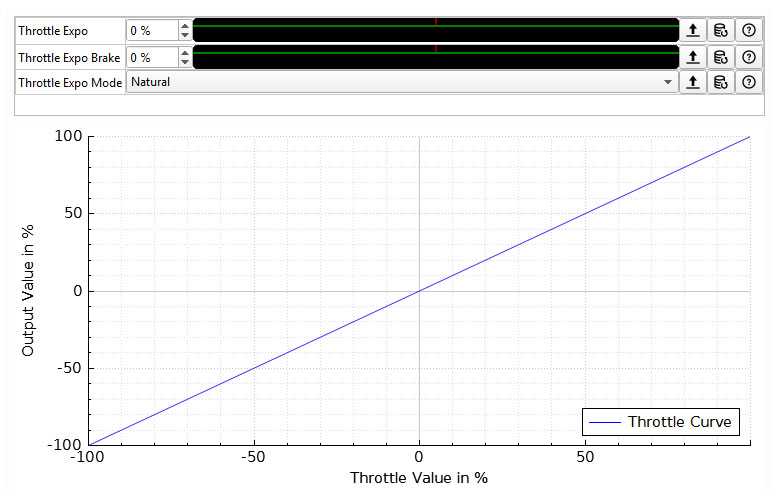
Change the Throttle Exp value to -20%, the Throttle Expo Brake value to -20% and the Throttle Expo Mode to Expo-Natural.
Now your curve will look like this.

In practice, this means that from neutral to acceleration and neutral to break the same amount of throttle will exert less impact, 20% less. I have an esk8 that runs 18/36 pulleys, that’s a lot of speed on 100mm wheels, I set both values at 35% to make the throttle more manageable. Give it a shot and let me know what you think.
EXTRAS: Good Reverse (You CAN’T Handle the Good Reverse!)
What, you want the ever elusive “Good” Reverse? Too bad, Frank says you can’t have it. But we don’t respect authority around here, we’re just a bunch of skaters, right? Here’s how you do it:
Insert your USB cable in the Master VESC, click Connect the click the Read App Config button. Go to App Settings > PPM > General. There is a value labeled Max Direction Switch ERPM Enabled. By default, it is set to False.

Set it to True (it should look like this).

Click the Write App Config button (it’s the down arrow with an A beside it on the right-hand side of the window). Give the remote a test throttle up, the down. Then return to neutral and pull down again, now you’re in reverse.
Finito 🙂
EXTRAS: Hybrid or Sensored Mode
By default, you are in Hybrid mode. That means you’re running Sensored at low speeds and Sensorless at high speeds. This is good for your VESC and performance.
Using Hybrid mode you are minimizing the impact of Sensored operation on the VESC while still getting the smooth start and quiet running at low speeds. Road noise kills the value of the quiet FOC gets you, in most cases, so no sensors at high speeds are not that noticeable.
Do what you want, experiment, see what feels right. If you decide to go full Sensored mode, here’s how you do it.
Insert your USB cable in the Master VESC, click Connect the click the Read App Config button. Go to Motor Settings > BLDC > General.

Set the value for Sensor Mode to Sensored. Click the Write App Config button and go test it out.

Click the Write App Config button and go test it out.
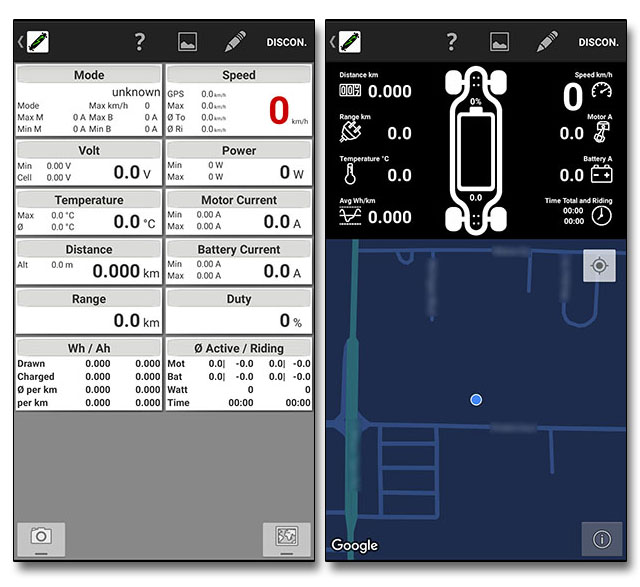
EXTRAS: Ackmaniac Android App
Here is a link to the Ackmaniac Android app (ESC Monitor) at the Google Play Store. It has lots of options, including the ability to change the modes, and it’s another benefit of having the Ackmaniac firmware installed on your ESC(s).
- Hoyt St Drive Train – The Cadillac of Esk8 drive systems - November 26, 2019
- DAVEGA X – Seductive Telemetry - October 22, 2019
- Why you should want Hummie Hubs and how to get them. - July 18, 2019